Blog Archives
My First Sewing Project
My First “Real” Sewing Project

What a great start to the new year. As I stated in an earlier post, I received my first sewing machine this year for christmas. I was so excited to use it that I went to our local Wal-mart the day after christmas and picked up some cheap material that had gone on clearance. After reading the manual from cover to cover, I took my material and started cutting and measuring. I did not have a pattern to go off so I just winged it.  The same day I went and picked up my cheap Christmas Material from Wal-Mart I stopped by our local Joanne Fabrics and bought some clearance material for other projects. I wanted to use the material that I bought from Wal-mart to practice on, However what I thought was going to be just a practice piece ended up being something that I thought turned out pretty nice and I wanted to share.
The tote bag is reversible. I honestly did not think I would enjoy sewing as much as I did after working on this project. There is so much you can do and so much to learn. I am just soaking it all in. I have so many ideas and I can’t wait to make them. I am truly looking forward to being able to make my sons Halloween costumes in the future along with clothing items for myself since there are not many adult clothes in my size and shopping in the older children’s section does not help me look 30. The list goes on and on of gift ideas that I can make for my family for their birthdays and holidays. Now I just have to learn to read patterns, reasons for using different types of stitches, and some other things that I’m sure I will learn with more experience. I look forward to showing you more of my projects as they are finished.
If you have any advice or links on sewing for beginners please leave them in the comments section. I really would like to get into quilting and making clothes. Thank you to all my family and friends for all the support this past year and for all your encouragement for our future. 
Happy Crafting during 2012 from my family to yours!

And Then There Was Silence
I hope everyone had a great Christmas this year. I know our family did. My son walked away with a houseful of Thomas and I received everything I wanted and more. My Husband also got what he wanted, so all in all being with our family this was the best Christmas so far. I’m sure we will have many more wonderful Christmas’s to come.
I have to say, I give a lot of credit to the people who host Christmas every year. With all the work that goes into just one day I feel like I just got Married all over again. I absolutely loved hosting Christmas this year, but I think if I ever get the chance to host again I will definitely be more organized the next time. I have to be grateful that my new place has the space to hold our family comfortably. I really didn’t have to worry about seating or food too much so that was a relief. All in All I think our First Christmas in our new place went very smoothly.
This was a year for many First’s in my family. We moved into our own place this year, We hosted our First Christmas, I received my First Sewing Machine, and that’s just to name a few. This was also my first year of going shopping the day after Christmas. I can honestly say that I think it will be my last. I have to give my husband the most credit as he was the one driving all day, taking me from store to store to find a few things. I really couldn’t imagine driving in that mess yesterday by myself. I honestly think that 70% of the people in Wisconsin forgot how to drive yesterday. There were accidents all over and people cutting people off, It was just a mad house. Also for being the day after Christmas you would think people would be in better moods. Every store we went into their were people yelling at each other and basically pushing people out-of-the-way to get that holiday discount. So having trucked my husband and my son through all that yesterday, I have decided that next year we can wait a few days before popping into the stores to see what’s left on the shelves.
I will be back on here sharing our crafting projects as soon as I organize through everything that we received this year and get it put away.
I’m very interested to hear about everyone elses Christmas’s and after Christmas shopping adventures. If you have any stories please share them in the comments section. I know I wasnt alone out there yesterday.
Happy Holidays,
Paper Christmas Light Garland
Paper Christmas Light Garland
I love Garland!! I don’t know why I just do. I was actually making these for ornaments originally, However last-minute turned it into garland. So really these cute little paper light bulbs would look great anywhere. Be careful when string them or hanging them as the ends are pretty flimsy.
Well let’s get started.
Supplies Needed:
- 1 sheet of red construction paper
- 1 sheet of white construction paper
- Glue
- Scissors
- Red glitter
- Silver glitter
- Gold glitter glue
- Hole punch
- String
- Black puffy Paint
Instructions:
- Draw or take a template of a classic style Christmas light bulb and trace it 10 times on each color construction paper.
- Cut out your light bulbs
- take all your red colored light bulbs and brush your glue on just the light bulb section of the light bulb.
- After you glue about 3 or 4 take your red glitter and sprinkle it over the light bulb making sure to cover all the glue.
- Repeat steps 3 and 4 or the rest of your red light bulbs.
- After you are done putting the glitter on the bulb take your gold glitter glue and cover the part of the light bulb that would screw in.
- Set aside all your red bulbs to dry for about 30 min.
- While your red bulbs are drying repeat steps 3-7 for the white construction paper light bulbs using the sliver glitter for the bulb part and continuing to use the gold glitter glue like you used for the red bulbs.
- After your 30 min or so are done for your red bulbs take your black puffy paint and draw 3 lines across the bottom part where the bulb would screw in.
- Then set aside again to dry for about 4-6 hours
- Repeat steps 9 and 10 for the silver bulbs.
- After your drying time has passed take your bulbs and repeat the whole process on the other side.
- When everything is done drying it’s time to string your bulbs and hang them up. Watch them sparkle.
Total time should take around 8-10 hours, However 90% of it is drying time.
For the people who are following me or are just finding this blog I have spent a total of $20.00 on supplies to make all the Christmas decorations and crafts for 2011. This will make the 13th project working off the same materials. The supplies consisted of:
- 200 sheets of construction paper (Large Pack $3.49)
- Big bottle of Elmers glue ($1.10)
- 1- 4 oz bottle of red glitter ($2.25)
- 1- 4 oz bottle of silver glitter ($2.25)
- 1 -4 oz bottle of gold glitter ($2.25)
- 1 -sm Tulip puffy paint black ($.97)
- 1 -sm Tulip puffy paint red ($.97)
- 1 -sm Tulip puffy paint white ($.97)
- 10 pack- of glitter glue ($1.00)
- 50 sheets of christmas colored tissue paper($2.99)
- 1 pack of Christmas colored fuzzy sticks ($1.00)
total $19.24 then add some tax.
Everything else was stuff I found lying around my house or was given to me for free. I just wanted to show for a small amount of money you can really make your house full of beautiful decorations and keepsake gift ideas.
I hope you enjoyed this tutorial. Please comment back and share your paper Christmas bulbs. I would love to see what you did with them.
Happy Holidays!
Enchantment in the Park
Enchantment in the Park
Every year my family takes our annual trip to see the Enchantment in the Park. Holiday lights are probably my families favorite part of this time of year besides the food. The Enchantment in the Park is a drive thru light show that plays music on a specific radio station and all the lights dance to the music. So far this year my family has gone 4 times. Its located about 10 min from my home and it brings a smile to all our faces as we drive thru it.
This event is held through our local rotary clubs in the county that I live in. I wanted to give them a little shout out because I think they do a wonderful job on their light displays and all the proceeds and donations are going to a great cause. Admission to go thru is either a $10 donation or a bag of food pantry items. We usually do the food pantry items because our son loves to rummage through the pantry bagging up the cans. He also likes to reach over and give the bags to the people collecting the cans. It seems like every year they change bits and pieces of the light show which is nice, that way every year you will see something different. This year there were over 340,000 LED lights lighting up in all different types of displays. My Favorite this year where the big presents. My son always likes the light up tunnel that you drive thru. My Husband says his favorite part was the big trees that were all lite up beautifully. The best part of going to one of these type of attractions is that there is more than just a light show.
As I had mentioned in an early post Our Family Trip to see Santa this was the first year we actually got out of the car to go see what else they had to do and look at. As we entered the first building they had a stage set up where different groups throughout the month would go sing Christmas songs and play instruments. They also had craft projects for the children to do on certain days. In the same room they had a concession stand set up selling snacks and refreshments. The hot apple cider is my favorite!! Then you walk out of the first building into a barn type building which is called the reindeer shed. This area was set up with cute wooden cut outs where people could stick their heads through for photo ops. There was a slide area for the kids to play and haystacks for everyone to sit on while they waited to get into the next building. there was a few other nice decorations scattered around the barn. After we got through the reindeer shed you walk into a small house looking building where an elf would greet you and have you sign Santa’s book. Then you get to sit on Mrs. Clauses lap and then last but not least the big man in red. After you leave you can go back to the first building and hang out if you like. We had decided to go around another time since we still had one bag left over. I would have to say the whole experience was great and everything was very well put together.
I know that there are other facilities that do this type of event, However for a family on a budget this is the cheapest in terms of money or donations. There are 3 other places with in 30 minutes of our home that do the same type of thing, However all 3 cost $15.00 and do not take food donations that I was able to see. A couple of them did have 1 or 2 nights where they accepted food donations for a $5.00 off to bring your admission to $10.00 per car load. These just so happen to be nights that my husband had to work. I am not trying to put these other facilities down, but to drive 20-30 miles away I felt like our money was better spent going to a good cause.
For a family on a budget I think this was a great activity for the whole family to enjoy that does not cost more than $10.00. In fact because we used coupons to buy our cans. Our 4 trips cost just under $10.00 and still gave 5 cans in every bag. The Event runs Thursday – Sunday every weekend starting the weekend of Thanksgiving then in December it starts running every night for the week of Christmas, However its closed on Christmas day but then runs again from the 26-29th. If you live locally or are traveling towards Southeastern Wisconsin it is a great place to stop and see a great light display.
I would also like to thank the 62 local business that helped sponsor the event this year and a BIG HATS OFF to the over 900 volunteers that worked through this event donating over 4600 hours so that families like mine could enjoy this and make it a tradition in our families holiday fun. Below I posted some photos from the light displays I hope you enjoy
Happy Holidays to Your Family From Ours!
Snowman Pop-up Christmas Card
Snowman Pop-up Christmas Card
The other week I was trying to decide whether to send out Christmas Cards. This was always something I had wanted to do but just never got around too. Well this year was no different. With finals just wrapping up this last week I felt like I was running around like a chicken with its head cut off. I am so glad this semester is finally over. Now on to the week before Christmas and I only finished one card. Now that all my crafting material and crafting area is set up in an accessible area, I feel a lot more organized then I did before I started this blog site. My wonderful Husband arranged things so I would be able to have my area where I can still see whats going on with our little one if he is playing with his toys. With all this in mind I fully intend on getting those Christmas Cards out next year!!
Well on to the tutorial…I took a few pictures with this one because I think that a picture might better explain the process.
Supplies Used:
- 1/2 Sheet of Blue Construction Paper
- 1/2 Sheet of White Construction Paper
- Glue
- Scissors
- Glitter
- Markers or Crayons
- Ruler
- Pen
Instructions:
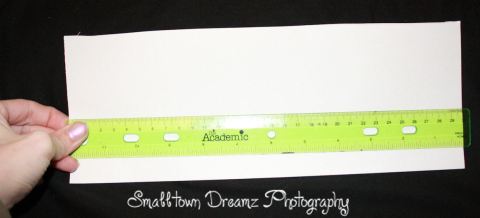
- I had taken a Piece of white printer paper and cut it in half the long way. The White Computer paper really was just not strong enough which is why in the supplies needed I suggested to use white construction paper. Oh and I had gone back and straitened my edge also. Write down the length of the White Paper.

- Cut between 1/8 to 1/2 inch on each short end of the white paper.
- The next step is to fold your white paper in half. You will also want to take a measurement of the width of the white paper at this time.

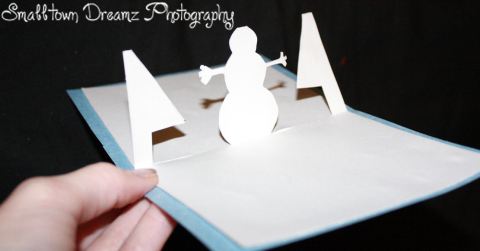
- Then take out your template of whatever shape you want to pop out of the card and trace it on to the white paper. I used a snowman and then free-handed the trees. You can freehand the thing if you want. I just so happen to have a bunch of these templates from other projects that I just recently made.

- Next bend your objects forward slightly and the access paper to the back.

- Open card slightly and tuck your object inside and make sure your access is still sticking up

- Then cut out off the access.
- On fold the entire thing so that it’s stretched out to its full length.

- Fold your card back up so that the object folds inside to the 2 solid white cover pieces.
- Next take your Blue colored Construction paper and cut this in half the long ways also. The width of the blue paper should be measured between 1/8 to 1/2 inch wider then the blue paper and 1/8 to 1/2 inch longer then the white paper.
- Fold your Blue piece of paper in half.
- Then stick in your white paper inside the blue paper to make sure your blue paper is sized up correctly with your white paper.

- Take your white paper out and place it on a scrap piece of paper or table.
- Color, Glitter, Decorate your object and write your message on the bottom or right hand solid section of the white paper. Set aside to dry if needed.
- Decorate and embellish the front of your blue paper.
- If your paper needed to dry or even if it didnt now you can take your white paper and glue it inside your blue paper.

I hope you enjoyed this tutorial on the pop-up snowman card. It was really fun to make. I just wish I would have had more time to get the rest of them done so I could have sent them out to the family. Please comment back and share your christmas pop-up cards.
I hope you and your family have a great holiday season!


