Blog Archives
Pom-Pom Tree for Valentine’s Day
 Tree of Love
Fun Valentine’s Project for you and the kids
Week 4 of the 5 Weeks of Love Challenge

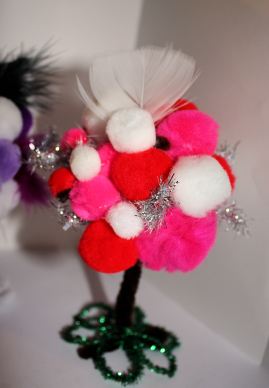
I saw an idea like this as I was searching for a something else and can not find where I saved the website name. So if by chance anyone knows who just recently did a tutorial for something like this let me know and I will be sure to put their name on here as an inspiration to how this project came to light. This was a lot of fun to work on with my little one. We played a counting game while we were holding the pom- poms on to set.
I wasn’t really sure how this was going to turn out but I wanted to give it a try anyway. I added the feathers for some extra flair and texture.
Honestly I think the hardest part was getting the support at the bottom just right to support the top.
The materials I used were
- Pom-Poms
- Chinelle Fuzzy Sticks
- Glue
- Feathers
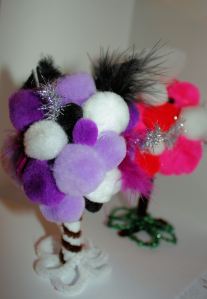
These look really cute in the window cill or the table as Valentine’s Day Decorations. I made a purple one for myself. I thought it was one of those things that would look nice on a shelf in my crafting area.
Happy February!!!
Indoor Igloo
Indoor Igloo
BURRR!!!! Baby it’s Cold Outside……Yes today was one of those bitterly cold days up here in good ol Wisconsin. Temperatures around 4 degrees without a windchill. These are the days that its to cold to send your kids out to play and they are itching to do something. Lucky for me I have a ton of unused flat rate boxes that I use to send out items once in a while. Really you can use any boxes you have lying around, or even sheets work for this. I remember back when I was Jesse’s age, that’s what my Brother and I used to build forts and tents in the house when we couldn’t go outside to play. I made sure not to destroy the boxes so I could use them again in the future.
As the morning set in today I could see that my little one had a little more energy than usual and figured that he could use a good project to work on and play with. I just received a brand new shipment of Large flat rate boxes and my Husband and I decided to build an indoor igloo for Jesse. My Husband did most of the constructing of little igloo while Jesse and I decorated the inside with his beanbag chair, a little clip on LED light, and some of his toys. We finished it off by adding a small flat rate box and taping it to the pillar and using it as his personal little mailbox. All this was done just in time for the mail lady to come and bring a letter that had some stickers in it for him to add to his stickerbook collection.
This extremely cheap family activity was able to give our entire family a fun-filled afternoon and evening. It was such a delight to see him interact like he was an adult going into his own home and then having to leave to go to work. (Just like his Daddy) When he would get home he would check his mail. Most of the time I just filled it with our left over junk mail. I love being able to do projects like this that make our little one interact, think, and problem solve. As Jesse was the one that added the chimney to the igloo. I just can’t see taking it down tonight so I am sure we will have another fun-filled day with it tomorrow, seeing how we are expecting up to 8 inches of snow tomorrow.
I just wanted to share this to remind everyone that it doesn’t take much to entertain your family and this did not cost us a dime. I look forward to sharing more of our cheap family activities as they come up. If you have any suggestions feel free to leave them in the comments section.
Stay warm
p.s. Yes that is a small “Christmas Tree in the corner of the photo. We are starting to get our Valentine’s day tree set up for next month. I will share photo’s after the tree is finished being decorated.
By the way Listia is a great place to get stickers, embellishments, and other materials for crafting really cheap. It’s where I get 75% of my material and even a few items to pamper myself once in a while. The reason I am telling you is because unlike Ebay its free. There are some items that might have minimal shipping costs, but for the most part you can find free shipping on a lot of items. You can find a link to it at the bottom of the page if you are interested in checking it out.
The 5 weeks of Love Challenge.
The 5 Weeks of Love Challenge.
With a fresh new start to the year, I would like to challenge myself. Since our next big unofficial holiday is in about 5 weeks, Yes I mean Valentine’s Day. Every week for the next 5 weeks I will make and then post a Valentine’s Day Project so that you can get some ideas on what to make for a loved ones for this unofficial holiday.
Nothing says LOVE like something from the heart.
For a wife and mom on a budget I have to get pretty creative sometimes with gift ideas. With all the new supplies I received during Christmas from my loved ones I should be able to use most of it and not have to spend hardly any money at all.
I would also like to set up a Featured Friday during this Challenge. We will choose one person every week to feature your homemade Valentine’s Day projects. If you are interested in having your project featured on here please email me at smalltowndreamz@gmail.com. I will post your project on friday with links to your own blog.
Check back soon to see what we come up with for week 1 of the 5 weeks of Love Challenge.
Happy Crafting!

Fuzzy Sticks Christmas Tree Ornaments
Fuzzy Sticks Christmas Tree Ornaments
A while back I had purchased a package of Fuzzy Sticks (pipe cleaners) at our local dollar store for $1.00 . I was trying to figure out what to do with them and decided to do what everyone does with them. So here are some quick 5 minute or less Christmas Tree Ornaments or Gift Topper ideas. I was really amazed at what I was able to get done while I was waiting for dinner to finish cooking. This is great for kids to do or as a last-minute decoration idea. I really liked working with the Fuzzy Sticks and I can’t wait to get spring colored sticks to continue working with them.
Below I posted the instructions and supplies that will be needed for each ornament. I hope you enjoy making these as much as we did!
Candy Cane
Supplies Needed:
-
1 White Fuzzy Stick
-
1 Red Fuzzy Stick
Instructions:
-
Bend the White Fuzzy Stick in half and then twist it together tightly
-
Do the same for the Red Fuzzy Stick.
-
Take both your White and Red Fuzzy Sticks together and twist them tightly as evenly as possible.
-
Lastly bend one end to make a hook
Thats it!
Wreath
Supplies Needed:
-
2 Green Fuzzy Stick
-
1 Red Fuzzy Stick
Instructions:
-
Take your 2 Green Fuzzy Sticks and twist them together.
-
Then bend it in half.
-
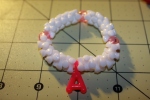
Take your bent half and your other end and bend it into a circle, twisting the ends together tightly.
-
The next step is take your Red Fuzzy Stick and cut about 1/3 of it off to make your bow.
-
Bend the Red Fuzzy Stick to make a small bow.
-
Then cut off another piece of the Red Stick about 1 inch long.
-
Attach your Red bow to your Green wreath with the 1 inch Red Fuzzy Stick.
All there is to it!
Christmas Tree
Supplies Needed:
-
2 White Fuzzy Stick
-
1 Red Fuzzy Stick
-
2 Brown Fuzzy Sticks
-
2 Green Fuzzy Sticks
Instructions:
-
Take your first Green Fuzzy Stick and bend it into a triangle, securing the ends at the top.
-
Take 1 of your Brown Fuzzy Sticks and cut it in half. bend it to make a 3/4 rectangle and twist the ends over the triangle to secure it.
-
Take the other 1/2 of the Brown Fuzzy Stick plus the other whole one and wrap them around your rectangle.
-
Then take your second Green Fuzzy Stick and size it up to the triangle making sure the ends stick over the bottom and over the top about a 1/2 so you can twist it on to the triangle.
-
Do the same with another strip of the Green Fuzzy Stick.
-
Make sure your 2 Green strips are secured to the bottom and the top.
-
The next step is to take 1 of your White Fuzzy Sticks and bend it into a star.
-
Cut a 1 inch Stick out of your other White Fuzzy Sticks and wrap it around the middle of your star and the top of the tree, so to secure the star on top of the tree.
-
Then cut an extra 5 1 inch strips of white and 5 1 inch strips of the red.
-
Take your strips and wrap them around the green spreading them out as you go.
All Finished!!
Like I said these are really quick to make and the kids will love to help. I hope you enjoy. Please comment back and share your Fuzzy Sticks Ornaments.


