Blog Archives
Valentine’s is right around the corner
So why not kick it off with a Massive Valentine’s Day Blog hop

Very First Quilting Square
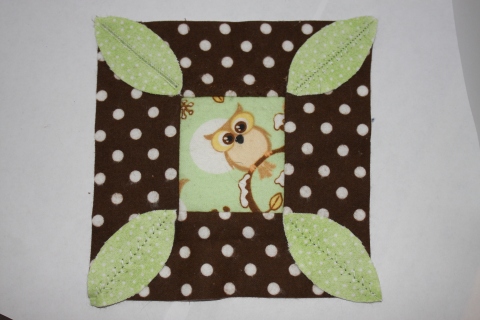
Thats right, its official I have a new love. QUILTING!!!!!! I had picked up a Fat Quarter Bundle at Wal-Mart the day after Christmas. Seeing how I just LOVE Owl Print, I knew exactly what I wanted it for. I just had to learn how to cut fabric and sew. After weeks of practicing on some old shirts I had cut up, I decided to try out my new skills and attempt to make my first quilting square. 
I just love this fabric and I found an online store that was selling it, however I believe that they stopped carrying it. Here is the site link if you wanted to see more fabric of hers.
The site is called Diaper Fabric Fanatic
One more thing….. I’m going to be linking to Quilt Story, see the sidebar for their Fabric Tuesday Button!!! Take a peek. There are other fabulous projects to see too. You will also be able find this on Red Pepper Quilts the Patchwork and Quilting Blog List.
Happy Quilting!!
Beaded Flower
Beaded Flower

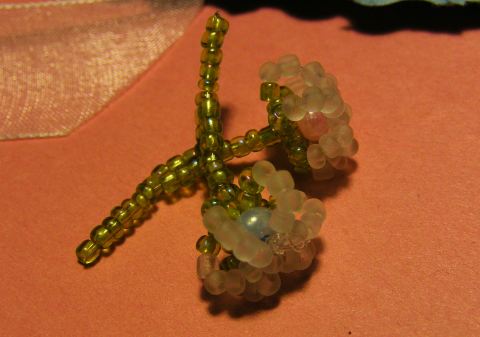
Recently I acquired a bunch of seed beads. For a couple of days I sat there sorting out the colors and just couldn’t decided what to do with them. After searching through some of my books I came across a beaded flower and tried it out for myself. I just wanted to show you the results. I thought it turned out pretty nicely. The little flowers are easy to make and they probably only take about 5-10 min a piece. They are small and can be used for many different types of crafting projects.
If you are interested in learning how to make these cute little embellishments leave a comment with your email address and I will send you a tutorial.

Happy Crafting
Family Hand Wreath
Family Hand Wreath
This was a project that even my Husband got into working on with us. So on one of his nights off we all sat down tracing hands and cutting them out. I still have not let my little one use a scissors yet, however he is showing great signs that he is ready for his first pair of safty scissors. Im sure this will be another proud moment is this crafting moms life. The layers in the wreath im sure are obvious as they go my little boy, myself, and then my husband.
Christmas Family Hand Wreath
Supplies:
- Average amount of sheets of paper per adult 6-10
- Average amount of sheets of paper per child 2-6
- 1 sheet of white paper
- glue
- clear tap
- glitter (red or silver)
- scissors
Instructions:
- Trace your child’s hand onto the piece of construction paper. ( It is best if you trace one and cut it out and then use that as a template for the rest) Make sure you try to utilize as much space as to fit as many hands on the paper as you can. My son is 4 yrs old and I was able to get 4 hands on a piece of paper and my husband was able to get 5 so try to sqeeze as many as you can to save on paper. I used 12 in my wreath. Do the same for every member in your family. For the adults you wont need as many hands because they will cover more space.
- After you have traced all your hands then cut them all out.
- After you are finished cutting out your hands be sure to place them all so that the ink side is facing you. If you wish to have your child color the wreath let them color the hands at this point then when they are done place them all so that the coloring side is face down.
- Now it is time to form your wreath. Start by working from the front to the back (securing each layer before moving on to the next.(steps 5 and 6)) Place your hands in a circle making sure you leave an empty space in the middle. Try and get the hands around the circle as evenly as possible.
- Now use your clear tap and place little pieces of tap around the inner edge to keep the hand wreath in position.
- Then take your glue and glue down the hands to each other.
- When you are finished gluing turn the wreath over and glue any other parts of the palms of the hands that are flopping around.
Thats it for the wreath. If you would like to add a paper bow the instructions for the bow are below
Bow Instructions:
- On your white piece of paper draw the shape of a bow and cut it out
- brush on a coat of glue on the entire bow
- sprinkle your glitter to cover the whole bow
- set aside and allow ample amount of drying time.
- When dry glue your bow onto the bottom of your wreath
Thats it!! Please comment back and I would love to see your Christmas Family Hand Wreaths


 Valentines Day Charms


