Blog Archives
Pom Pom Pillow
Posted by smalltownmama08
Getting Sidetracked
So yesterday with our sudden small blizzard I had the full intention of going in strong with trying to get as much done on my baby owl quilt as possible and actually I think I did get pretty far. That will be updated in a post next week when I share it for the WIP Wednesday over at Freshly Pieced.
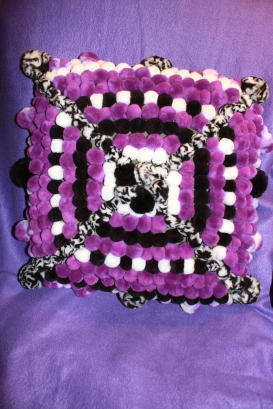
Anyway just as I seemed to be cruising along on the quilt I stopped to get something out of the drawer when I looked up and saw my brand new shipment of pom poms staring me in the face and they started calling to me. Wouldnt you know with in 5 min I had my sewing machine and fabric moved and out-of-the-way and 1000 pom poms staring me in the face. There were so many colors and sizes, Honestly I was a little overwhelmed for about 2 min trying to figure out what I was going to do with all these poms. Seeing how I won these in an auction for free on Listia and free shipping to boot this was definitely one of my better so-called “Savings” when it comes to keeping the budget down.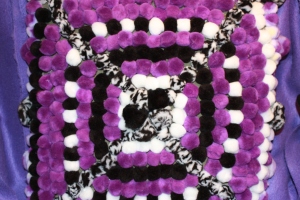 After sorting through all the colors and of course separating them into their own colored bags I took my favorite color and then the obvious contrasting colors of black and white, pulled out the hot glue gun grabbed an old throw pillow that needed some restoration and got to work.
 I used some of my purple fleece fabric to finish it off in the back. I think its cute. If I would have known then what I know now then I would have covered the whole pillow in the fleece before glueing on the Poms. There are a couple of spots that I am going to go back and fill in where the old ugly green fabric is showing through. Also I probably would not use the bigger ones on the edge. The picture in my head didn’t exactly turn out in real life.
 I measured the Fleece to the size of the pillow knowing that it had a bit of stretch in it so that it could be pulled tight. I took the edge of the fleece and hot glued it to the edge of the last row of Poms securing it just underneath so the poms would stick over a bit hiding the fleece edge as much as possible.
So this is what happens when I get sidetracked. I finish other projects and not the one intended. Has this happened to you? I am sure it happens to everyone. I wouldn’t necessarily say it’s always a bad thing. I say as you are not getting sidetracked when it comes to the important things then its ok in my book. Well I look forward to sharing what I did get finished with the Owl Quilt, maybe I can sneak a few more hours in and get the baby almost done by Wednesday.
Happy Crafting from my home to yours

Rate this:
Share this:
- Click to share on Twitter (Opens in new window)
- Click to share on Facebook (Opens in new window)
- Click to print (Opens in new window)
- Click to share on Reddit (Opens in new window)
- Click to email a link to a friend (Opens in new window)
- Click to share on Tumblr (Opens in new window)
- Click to share on LinkedIn (Opens in new window)
Posted in Fabric, Home Decor, pom poms, Upcycled
Tags: crafts, decorations, DIY, Fabric, Free, hot glue, Listia, no-sew, pom pom pillow cover, Pom-Poms, Quick and Easy
Valentine Magnets
Posted by smalltownmama08
 Valentine Magnets
Week 2 of the 5 Weeks of Love Challenge
As we enter week 2 of the 5 Weeks of Love Challenge I wanted to add something that not only has to be used during Valentine’s day but they are cute enough to be left up for however long you like. I love magnets because I like to hang things for reminders, to hand our little ones art work, or just little love notes to the hubby. What better way to hang those cute little notes then with a magnet of love. 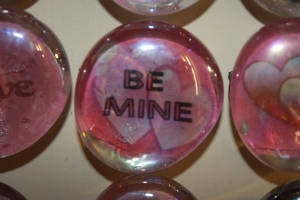
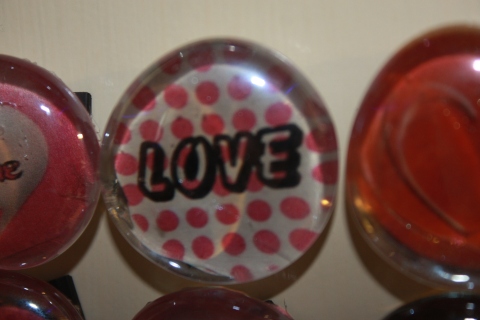
So there is an ever abundance of these bottle cap images going around and I never have those type of caps lying around here, I decided to try something with some of these images. This was actually a really fun project can be easily made on your pc and printed on your printer. Once again I acquired some of these bottle cap images from Listia, I didn’t want to take the time of designing my own just yet, however I did just recently finish my first set. I was able to pick up these cute Valentines Day images for very few points and seeing how they were already made to size all I had to do was print them out.
The supplies I used were those 1 inch decorative clear stones (which I picked up at my local wal-mart for a little over $3.00 for a 3 lb bag), hot glue, your 1 inch images cut out, and a magnet strip. Make sure when picking out your magnets that you use a heavier duty magnet, seeing how the stones are a bit heavy. You don’t want them to drop every time you shut your refrigerator door. The process is actually quit easy, however because of the hot glue this isn’t a project I would let the kids work on by themselves.
The first thing you do is take your 1 inch circular image and place it on your workspace. Apply a decent amount of hot glue on top of the face of the image, Then take your stone and press it down over the image, making sure the hot glue has covered the entire image between the stone and the image. This will make for a clearer image. The next step is to take your stone and flip it over and apply a decent amount of hot glue to the back, then securing the magnet onto the back of the image. Make sure when doing this last process that you make sure there are no big lumps that make the magnet stick out far on one side otherwise you will have an unstable stone that will most likely fall on one of your toes. Really that is all there is to it. I decided to take some of my silver glitter nail polish and painted the backs of them just for a little extra bling.
Below are some other magnets that I did that are great gifts birthdays, holidays, or just because.
Happy Crafting!

Rate this:
Share this:
- Click to share on Twitter (Opens in new window)
- Click to share on Facebook (Opens in new window)
- Click to print (Opens in new window)
- Click to share on Reddit (Opens in new window)
- Click to email a link to a friend (Opens in new window)
- Click to share on Tumblr (Opens in new window)
- Click to share on LinkedIn (Opens in new window)
Posted in Valentine's Day
Tags: bottlecap images, challenge, crafts, decorations, DIY, glass stones, hot glue, Listia, Love, magnets, Valentine's Day
Valentine’s Day Charms
Posted by smalltownmama08
 Valentines Day Charms
Week 1 of the 5 Weeks of Love Challenge
I have recently started working with beads again. It really started by me going through all my stuff after christmas this year and organizing it. I came across this huge bag of glass beads that I have collected over the years. I sat down and organized them by color and realized that I had some really cool looking beads. So as the ideas started rushing into my head the next thing I knew I had 5 Charms/Keychains done. After finishing them I sat back and realized they would make great gift topper or just a great side gift if you are giving a a lot of small items for valentine’s day. These would also make great valentine’s for your kids to give to their friends as they make great charms for backpacks and other accessories.
Small little trinkets like these are things that your loved ones can carry around all the time, to remind them that you were thinking about them and that you loved them. These are quick to make and they don’t cost a lot to make either. These are great projects for you and your children to work on together. There are plenty of pretty plastic beads for the younger children to be able to string together and wear.
The only supplies I used were a handful of glass and Tibetan silver beads, embroidery floss, clear bead string, and a plastic circle of some kind. I use the plastic reminder pieces for knitting/crocheting. I look forward to making some more of these in the future. I would like to make one for myself using Swarovski Crystal Elements. I think that would really sparkle.
Beading can be a very expensive hobby so its best to look on Craigslist, Garage sales, or even your auction sites like Ebay and Listia can have some great deals on bead lots. You don’t need a lot of beads to make something small and beautiful like this. Just enough to give it some color and class.
Valentine’s day doesn’t just have to be about the celebration of love between a couple. This can be a holiday about celebrating the love of everyone around you. Here are some other great charms or key chain ideas that you can make for your loved ones that celebrate the love of a life. As much as we know that Valentine’s Day is just one of those made up Hallmark type of Holidays why not take the time to tell all the people who you care about that you love and appreciate them. It never hurts to take the time to show someone you care or that you were thinking about them. 

I hope you enjoy these as much as I enjoyed making them. I look forward to another great week. I am still looking into finding a blog for our Featured Friday spot. I do have a couple of blogs in mind I am just not sure on how to contact them to ask them permission to feature them on this site. Untill next time…..
Happy Crafting!
This was the bead project I worked on with my little guy and an idea for the younger kids to give as gifts or to make for themselves.
Rate this:
Share this:
- Click to share on Twitter (Opens in new window)
- Click to share on Facebook (Opens in new window)
- Click to print (Opens in new window)
- Click to share on Reddit (Opens in new window)
- Click to email a link to a friend (Opens in new window)
- Click to share on Tumblr (Opens in new window)
- Click to share on LinkedIn (Opens in new window)
Posted in Family, Valentine's Day
Tags: beads, bracelets, challenge, charms, DIY, Family, featured friday, glass beads, hearts, holidays, Keepsake, keychain, kids crafts, Listia, Love, Quick and Easy, Valentine's Day
